Oil-Free Chips: Your Ultimate Guide to Crunchy Homemade Snacks
Few foods are as universally adored as the humble potato chip. That irresistible combination of salty, crispy perfection makes them a go-to snack for movie nights, lunch accompaniments, or just a little pick-me-up. But let's be honest, store-bought chips often come with a hefty dose of oil and additives that many of us would prefer to avoid. What if you could capture that satisfying crunch, amplify the fresh potato flavor, and customize every seasoning – all without a single drop of added oil? Welcome to the world of oil-free homemade potato chips! This comprehensive guide will walk you through everything you need to know, from selecting the right potato to mastering three different cooking methods: oven, microwave, and air fryer. Prepare to transform simple potatoes into a guilt-free, incredibly delicious snack that truly tastes better than anything you'll find in a bag.The Secret to Perfectly Crispy Oil-Free Chips: Prep is Key
Achieving that coveted crispiness without oil isn't magic; it's all in the preparation. Every step, from slicing to seasoning, plays a crucial role in the final texture and flavor of your homemade potato chips.Precision Slicing: The Foundation of Crispiness
Uniformity is king when making chips. Uneven slices will cook at different rates, leading to some burnt bits and some undercooked, soggy pieces.- Mandoline Master: For truly paper-thin, consistent slices, a mandoline slicer is your best friend. It provides the precision necessary for perfect chips. Aim for slices that are almost translucent.
- Knife Skills: If you don't have a mandoline, a sharp chef's knife and a steady hand can still get the job done. Take your time to ensure each slice is as thin and uniform as possible.
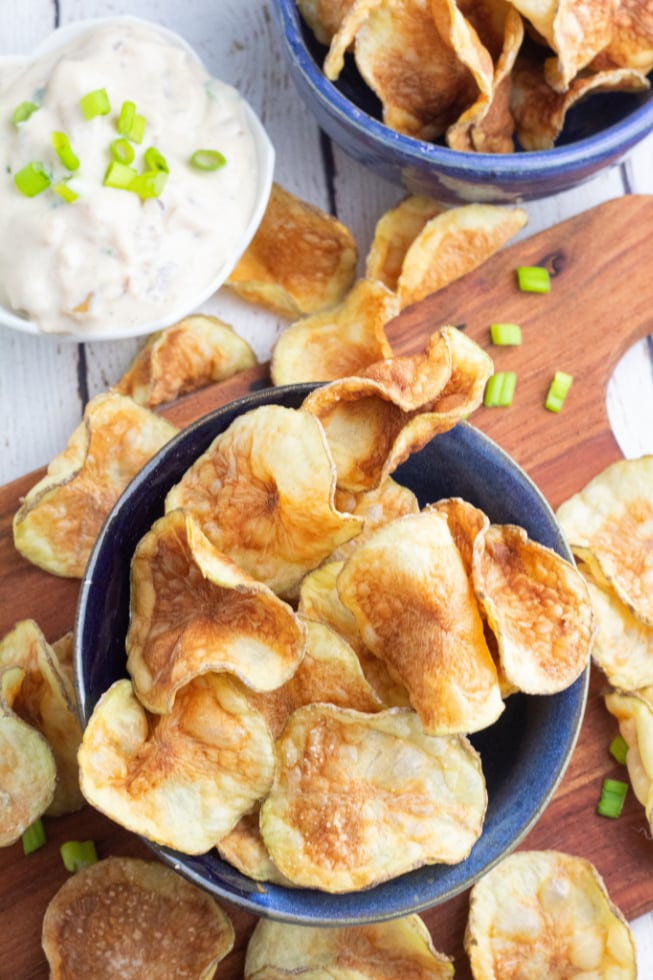
- Potato Choice: Russet potatoes are highly recommended for homemade potato chips due to their high starch content, which contributes significantly to crispiness. Other starchy varieties like Yukon Golds can also work well.
The Essential Starch Soak: Your Crispy Ally
This step is non-negotiable for oil-free chips. Soaking potato slices serves two vital purposes:- Removes Excess Starch: Surface starch can make your chips stick together and prevent them from crisping up properly. Soaking draws out this excess starch.
- Prevents Browning: The water also helps prevent the potatoes from browning too quickly before they’ve had a chance to crisp.
Pat Dry, Then Dry Again: The Ultimate Crisp Factor
This might be the most crucial step for oil-free chips. Any residual moisture will steam the potatoes instead of crisping them, resulting in a chewy, disappointing chip.- Initial Patting: Spread the potato slices in a single layer on clean paper towels or a clean kitchen towel. Pat them thoroughly until they feel dry to the touch.
- Air Drying (Recommended): For optimal results, leave the patted-dry slices spread out on dry paper towels or a cooling rack for an additional 10-15 minutes to air dry further. The drier they are, the crispier they will become.
Seasoning for Flavor Brilliance
Once your potatoes are bone-dry, it's time to season them. Since there's no oil to help flavors adhere, a light hand and even distribution are key.While some recipes, like Jawad's mentioned in a popular guide, might incorporate a touch of olive oil for crispiness, our focus today is on achieving that perfect crunch without any added fats. Instead, let's make the most of dry seasonings:
- Classic Salt: Fine sea salt or pink Himalayan salt works beautifully.
- Garlic & Paprika: As inspired by Jawad's recipe, these are fantastic flavor bases. Smoked paprika adds a wonderful depth.
- Spicy Kick: A pinch of cayenne pepper or chili powder.
- Cheesy Goodness (Vegan): Nutritional yeast offers a savory, cheesy flavor without dairy.
- Herbal Notes: Dried rosemary, thyme, or oregano can elevate your chips.
- Everything Bagel Seasoning: For a bold, complex flavor profile.
Mastering Your Kitchen Appliances: Oven, Microwave & Air Fryer Methods
Each cooking method offers a slightly different result and convenience factor. Experiment to find your favorite way to make these delicious homemade potato chips!Oven Baked Oil-Free Chips
The oven method produces a satisfyingly crisp chip, though sometimes slightly softer than its air-fried counterparts.- Preheat: Preheat your oven to 400°F (200°C).
- Prepare Tray: Line a baking sheet with parchment paper. This is crucial for preventing sticking and making cleanup a breeze.
- Arrange: Place the seasoned potato slices in a single layer on the parchment paper, ensuring no chips overlap. Overlapping will lead to steaming, not crisping.
- Bake & Watch: Bake for 5-10 minutes. Watch carefully! Ovens vary, and thin slices can go from perfectly golden to burnt in seconds. Remove them when they are lightly brown and crispy. You might need to rotate the baking sheet halfway through for even cooking.
- Cool: Transfer to a wire rack to cool completely. They will crisp up further as they cool.
Speedy Microwave Oil-Free Chips
The microwave is surprisingly effective for quick, small batches of crispy oil-free chips.- Prepare Plate: Arrange potato slices in a single layer on a microwave-safe plate. Again, no overlapping!
- First Cook: Microwave on high for 3 minutes.
- Flip & Cook Again: Carefully flip each slice. Microwave for an additional 2 minutes.
- Observe & Adjust: Continue microwaving in 30-second to 1-minute intervals, flipping as needed, until the chips are lightly browned and crisp. This method requires close observation as microwave power varies wildly. They may not get as deeply golden as oven or air fryer chips, but they will be crunchy.
- Cool: Let them cool on the plate or transfer to a wire rack to achieve maximum crispness.
Crispy Air Fryer Oil-Free Chips
For many, the air fryer is the undisputed champion for oil-free crispiness, often yielding results closest to traditional fried chips.- Layering: Place seasoned potato slices in your air fryer basket in layers. While the reference suggests up to 4 layers, for best results and maximum crispiness, aim for 2-3 layers at most, ensuring good air circulation. You'll likely need to cook in batches.
- First Fry (Dry): Set your air fryer to 170°F (77°C) and cook for 20 minutes, tossing the basket every 5 minutes. This low-temperature stage effectively dries out the potatoes.
- Second Fry (Crisp): Once the potatoes are dry and slightly shrunken, increase the temperature to 400°F (200°C) and cook for an additional 5 minutes, or until they are golden brown and crunchy. Keep a close eye on them during this stage, as they can burn quickly.
- Cool: Transfer to a wire rack to cool. The residual heat will continue to crisp them.
Beyond Potatoes: Exploring Other Vegetable Chips
The beauty of oil-free chips extends beyond just potatoes! The same techniques can be applied to a variety of other vegetables, offering different flavors, textures, and nutritional profiles.- Sweet Potatoes: Offer a naturally sweeter chip, often with a slightly chewier texture and beautiful color.
- Beets: Earthy and vibrant, beet chips are a visually stunning and flavorful alternative.
- Carrots: Sweet and delicate, carrot chips can be surprisingly addictive.
- Zucchini: Require exceptionally thin slicing and thorough drying due to their high water content, but yield a very light chip.
- Rutabaga & Turnip: Offer a more robust, slightly peppery flavor.
Troubleshooting & Pro Tips for Ultimate Crunch
Even with the best intentions, homemade oil-free chips can sometimes fall short of expectations. Here are some common issues and how to resolve them, along with extra tips for success:- Soggy Chips: This is almost always due to insufficient drying. Ensure your potato slices are *bone-dry* before cooking. Overcrowding your cooking vessel can also lead to steaming rather than crisping.
- Uneven Cooking: Poor slicing uniformity is the culprit here. Use a mandoline for consistency. Also, ensure a single layer for oven and microwave methods, and don't overcrowd the air fryer basket.
- Burning Quickly: This usually means your heat is too high or you're not watching them closely enough. Every oven and appliance is different; learn yours!
- Chips Stick to Tray: Always use parchment paper for oven baking. For air fryers, a light spray of water on the basket can sometimes help, though usually, parchment isn't needed if the chips are dry enough.
- Cooling is Key: Remember, chips continue to crisp as they cool. Don't judge their final texture straight out of the oven, microwave, or air fryer.
- Storage: While homemade chips are best enjoyed immediately (and you likely won't have leftovers!), if you do, store them in an airtight container at room temperature for a day or two. They may soften slightly.
