Crispy Homemade Baked Chips: Easier, Healthier & Better Than Store-Bought
Few culinary delights capture our hearts quite like the humble potato chip. That irresistible crunch, the perfect salty seasoning, the sheer snackability – it’s a universal pleasure. For many, a bag of chips is a permanent fixture on the grocery list, a go-to treat for movie nights or midday cravings. But what if we told you that the ultimate chip experience doesn't come from a bag, but from your very own kitchen? That's right, crafting
homemade potato chips is surprisingly simple, undeniably healthier, and delivers a freshness and flavor profile that store-bought options simply can't match.
Forget the days of deciphering ingredient labels and questioning artificial additives. With just a handful of basic ingredients – primarily potatoes, a touch of oil (or none at all!), and your favorite seasonings – you can create a snack that not only satisfies every craving but also fills your home with an enticing aroma. These crispy, savory delights check all the boxes, offering a satisfying snack that's easy to customize, economical, and a true testament to the magic of simple ingredients. Prepare to fall in love with chips all over again, because once you taste the difference of homemade, you won't count on leftovers!
The Unmatched Appeal of Homemade Potato Chips
Why go through the effort of making chips when countless varieties line supermarket shelves? The answer lies in a combination of taste, health, and unparalleled customization. Store-bought chips often rely on highly processed oils, excessive sodium, and a host of artificial flavors and preservatives to achieve their shelf-stable crunch. When you make them yourself, you control every single element.
Imagine biting into a chip so fresh it practically sings, with the natural flavor of the potato shining through, perfectly complemented by your chosen seasoning blend. That's the promise of
homemade potato chips. They offer:
*
Superior Freshness & Taste: There’s no comparison to a chip made moments before it's enjoyed. The vibrant potato flavor, the pristine crispness – it's an experience in itself.
*
Healthier Choice: You dictate the type and amount of oil (or opt for an
Oil-Free Chips: Oven, Microwave & Air Fryer Methods Guide), and you control the salt and spices. This means fewer unhealthy fats, less sodium, and no obscure additives.
*
Cost-Effectiveness: A bag of potatoes is significantly cheaper than multiple bags of chips, making this a budget-friendly snack option.
*
Endless Customization: From classic salt and pepper to gourmet blends, you're the master of flavor. This adaptability makes them perfect for any palate or occasion.
*
Dietary Friendliness: Whether you're vegan, gluten-free, or simply looking to reduce processed foods, homemade chips fit seamlessly into almost any diet.
Mastering the Art of Crispy Homemade Baked Chips: Your Step-by-Step Guide
Creating perfectly crispy, golden chips at home is more of an art than a science, requiring attention to a few crucial details. With these steps, you'll be well on your way to chip-making mastery.
Ingredient Spotlight: The Foundation of Flavor
The magic begins with selecting the right potatoes and complementary seasonings.
*
Potatoes: For the classic crispy chip,
russet potatoes are your best friend. Their high starch content makes them ideal for achieving that coveted crunch. Other options like Yukon Gold or even red potatoes can work, but russets generally yield the crispiest results. Opt for medium-sized, firm potatoes without green spots or sprouts.
*
Oil: A drizzle of olive oil is a popular choice for baking, adding a subtle richness and helping with crispness. Avocado oil is another excellent option due to its neutral flavor and high smoke point. For those seeking an even lighter option, remember that delicious chips can be made entirely without oil, especially when utilizing an air fryer or microwave, as explored in our guide on
Oil-Free Chips: Oven, Microwave & Air Fryer Methods Guide.
*
Seasonings: This is where you get to truly personalize your chips. Start with a simple foundation of salt, fresh black pepper, and perhaps a pinch of garlic powder and paprika – a truly delicious combination. But don't stop there! Experiment with onion powder, chili powder for a spicy kick, dried herbs like dill or rosemary, or even a sprinkle of nutritional yeast for a cheesy flavor. The possibilities are limitless.
Preparation is Key: Slicing & Soaking for Superior Crispiness
The path to perfectly crispy chips hinges on proper preparation before they even touch the heat.
*
Slicing Uniformity: This is arguably the most critical step. For even cooking and consistent crispness, potato slices must be as thin and uniform as possible. A mandoline slicer is an invaluable tool for this, allowing you to achieve paper-thin, consistent slices effortlessly. If using a sharp chef's knife, take your time and aim for slices no thicker than a credit card. Inconsistent thickness will lead to some chips burning while others remain undercooked and soft.
*
The Essential Soak: Once sliced, immediately place your potato rounds into a large bowl of cold water. Let them soak for at least 30 minutes, or even up to an hour. This step serves two vital purposes:
1. It helps prevent the potatoes from browning prematurely due to oxidation.
2. More importantly, it removes excess starch from the potato surface. This starch is what can make chips sticky, gummy, or prevent them from getting truly crisp.
*
Thorough Drying: After soaking, drain the potatoes thoroughly. Then, spread them out in a single layer on clean paper towels or a clean kitchen towel. Pat them *extremely* dry. Any residual moisture will steam the chips instead of allowing them to crisp up, leading to soggy results. Don't skip this step – it's fundamental for achieving that satisfying crunch! For more in-depth guidance on these crucial initial steps, check out our guide on
Achieve Perfect Crispy Chips: Slicing, Soaking & Cook Methods.
*
Seasoning: Once perfectly dry, transfer the slices to a clean bowl. Drizzle with a minimal amount of your chosen oil (if using) and sprinkle generously with your desired seasonings. Toss gently to ensure every slice is evenly coated.
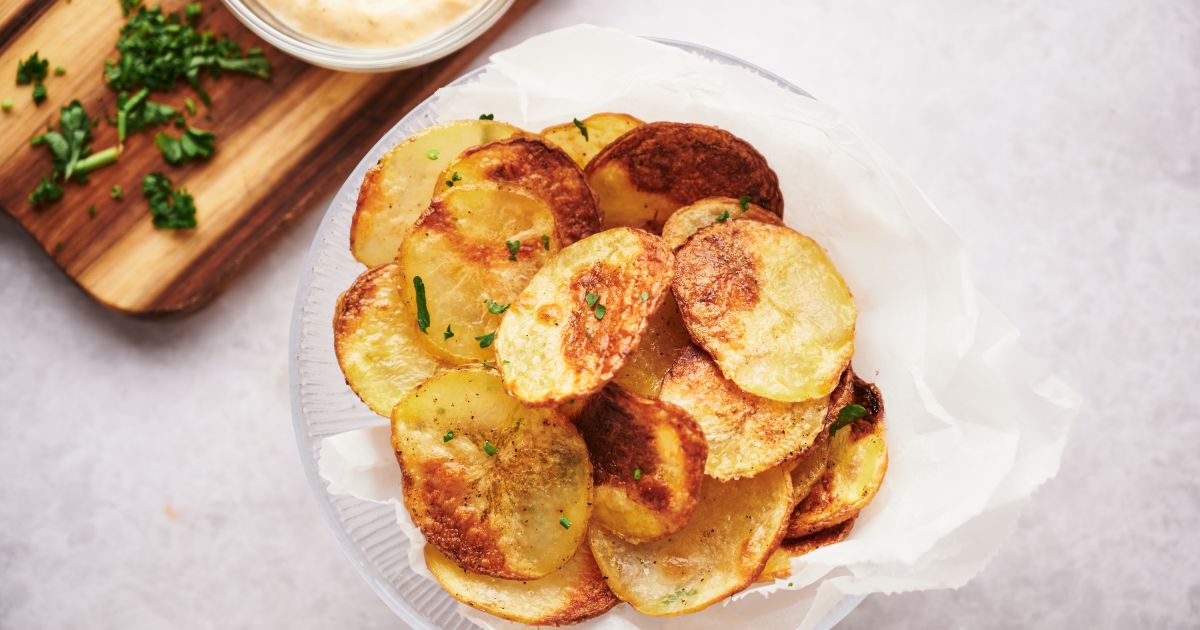
Baking to Perfection: The Oven Method
The oven offers a reliable way to achieve great baked chips with minimal fuss.
1.
Preheat: Preheat your oven to a consistent 400°F (200°C).
2.
Prepare Baking Sheets: Line large baking sheets with parchment paper. This prevents sticking and makes cleanup a breeze.
3.
Single Layer: Arrange the seasoned potato slices in a single layer on the prepared baking sheets. Crucially, ensure there is no overlapping. Overcrowding will trap steam and prevent crisping. If necessary, use multiple baking sheets.
4.
Bake & Watch: Bake for 5-10 minutes, but start checking earlier. Ovens vary significantly, and thin slices cook quickly. Begin checking for crispness and light browning around the edges at the 5-minute mark. You may need to flip them halfway through for even cooking. Remove them from the oven as soon as they are crispy and lightly golden brown. They will continue to crisp slightly as they cool.
While the oven method produces wonderfully delicious chips, they tend to be a touch softer than those cooked with higher-heat, more direct methods.
Beyond the Oven: Exploring Other Cooking Methods for Ultimate Crunch
If you're chasing the absolute crispiest chip or prefer speed, the microwave and air fryer offer fantastic alternatives.
Microwave Magic for Quick Chips
For an incredibly fast snack, the microwave can deliver surprisingly good results.
1.
Single Layer: Arrange potato slices in a single layer on a microwave-safe plate.
2.
Initial Cook: Microwave on high for 3 minutes.
3.
Flip & Continue: Flip the slices over and continue cooking on high for an additional 2 minutes.
4.
Watch Carefully: Microwaves vary greatly in power. Watch your chips very carefully during the final minutes. Remove them when they are lightly browned and crisp. You may need to add short bursts of 30 seconds if they're not quite there. This method is incredibly fast but requires vigilant observation to prevent burning.
Air Fryer Excellence: For the Crispiest Results
The air fryer has become a home chef favorite for its ability to mimic deep-frying textures with far less oil, making it perfect for truly crunchy chips.
1.
Pre-Dry (Optional but Recommended): For maximum crispiness, some air fryer enthusiasts like to pre-fry the potatoes at a lower temperature to dry them out before crisping.
2.
Layering: Place seasoned potato slices in the air fryer basket. While you can layer them more than in an oven, aim for no more than 4 layers to ensure good airflow. You'll likely need to cook in batches.
3.
Initial Fry (Drying Phase): Fry at a lower temperature of 170°F (77°C) for 20 minutes, tossing the basket every 5 minutes. This step is crucial for drawing out moisture.
4.
Crisping Phase: Once the potatoes appear dry, increase the temperature to 400°F (200°C) and cook for an additional 5 minutes, or until they reach your desired level of crunch and golden brown color. Continue tossing the basket frequently to ensure even crisping. The air fryer often produces the crispiest
homemade potato chips you can achieve without deep-frying.
Unleash Your Inner Chip Creator: Customization and Variety
One of the greatest joys of making homemade chips is the freedom to experiment.
*
Flavor Profiles: Beyond the basics, consider:
*
Spicy: A dash of cayenne pepper or smoked chipotle powder.
*
Cheesy: Grated Parmesan (add after cooking for baked chips), nutritional yeast, or a store-bought cheese powder.
*
Herbal: Finely chopped fresh rosemary or dried Italian herbs.
*
Smoky: Smoked paprika or a pinch of liquid smoke.
*
Sweet & Savory: Try sweet paprika with a hint of brown sugar for sweet potato chips.
*
Beyond Potatoes: Don't limit yourself to just potatoes! The same slicing, soaking, and cooking techniques can be applied to a variety of other root vegetables and even some greens. Experiment with:
*
Sweet Potatoes: Offer a naturally sweeter, vibrant orange chip.
*
Beets: For beautiful, earthy, purple-hued chips.
*
Carrots: Slightly sweet and vibrant.
*
Zucchini: A lighter, more delicate chip (skip the soak for zucchini, just slice and dry).
*
Rutabaga and Turnip: Offer unique, savory flavor profiles.
Keep in mind that the texture and crispiness will vary depending on the vegetable, cook time, slice thickness, and cooking method. You might find the oven method produces a slightly softer chip for denser vegetables, while the air fryer really shines for achieving crispness across the board.
*
Serving Suggestions: Enjoy your fresh chips plain, or elevate them with homemade dips like fresh salsa, creamy guacamole, or a zesty hummus. They also make a fantastic sidekick to sandwiches, burgers, or even as a crunchy topping for salads.
*
Storage: Homemade chips are truly best eaten fresh, ideally within a few hours of making them. If you do have leftovers, store them in an airtight container at room temperature for a day or two, but be prepared for a slight loss of crispness over time. A quick reheat in a dry pan or air fryer can sometimes revive their crunch.
Savor the Crunch: Your Homemade Chip Journey Awaits
Making
homemade potato chips is more than just a recipe; it's an experience. It's about taking simple, wholesome ingredients and transforming them into a snack that far surpasses anything you can buy in a bag. From the satisfying process of slicing and seasoning to the incredible aroma that fills your kitchen, every step is a delight. You gain complete control over ingredients, flavor, and texture, all while creating a healthier, more delicious alternative to store-bought options.
So, next time that chip craving hits, skip the grocery aisle and head to your pantry. With a few potatoes, some imagination, and our detailed guide, you're just minutes away from enjoying the crispiest, most flavorful, and utterly satisfying chips you've ever tasted. Get ready to impress your taste buds and redefine your snack game – because homemade truly is better.